Blogger Tips and TricksLatest Tips And TricksBlogger Tricks

Develop a native application that uses GPS location information.

1)Open eclipse or android studio and select new android project
2)Give project name and select next
3) Choose the android version.Choose the lowest android version(Android 2.2) and select next
4) Enter the package name.package name must be two word seprated by comma and click finish
5)Go to package explorer in the left hand side.select our project.
6)Go to res folder and select layout.Double click the main.xml file.Add the code below
<?xml version="1.0" encoding="utf-8"?>
    <RelativeLayout xmlns:android="http://schemas.android.com/apk/res/android"
        android:id="@+id/relativeLayout1"
        android:layout_width="match_parent"
        android:layout_height="match_parent" >
<Button
    android:id="@+id/show_Location"
    android:layout_width="wrap_content"
    android:layout_height="wrap_content"
    android:text="Show_Location"
    android:layout_centerVertical="true"
    android:layout_centerHorizontal="true"
    />
</RelativeLayout>
7) Now select mainactivity.java file and type the following code.In my coding maniactivity name is GPSlocationActivity.

package gps.location;

//import android.R;
import android.app.Activity;
import android.os.Bundle;
import android.view.View;
import android.widget.Button;
import android.widget.Toast;

public class GPSlocationActivity extends Activity {
    /** Called when the activity is first created. */
    Button btnShowLocation;
    GPStrace gps;
    @Override
    public void onCreate(Bundle savedInstanceState) {
        super.onCreate(savedInstanceState);
        setContentView(R.layout.main);
        btnShowLocation=(Button)findViewById(R.id.show_Location);
        btnShowLocation.setOnClickListener(new View.OnClickListener() {
            @Override
            public void onClick(View v) {
                // TODO Auto-generated method stub
                gps=new GPStrace(GPSlocationActivity.this);
                if(gps.canGetLocation()){
                    double latitude=gps.getLatitude();
                    double longitude=gps.getLongtiude();
                    Toast.makeText(getApplicationContext(),"Your Location is \nLat:"+latitude+"\nLong:"+longitude, Toast.LENGTH_LONG).show();
                }
                else
                {
                    gps.showSettingAlert();
                            }
             
              
            }
        });
    }
}
8)Go to src folder and Right Click on your package folder and choose new class and give the class nams as GPStrace
9)Select the GPStrace.java file and paste the following code.

package gps.location;
import android.app.AlertDialog;
import android.app.Service;
import android.content.Context;
import android.content.DialogInterface;
import android.content.Intent;
import android.location.Location;
import android.location.LocationListener;
import android.location.LocationManager;
import android.os.Bundle;
import android.os.IBinder;
import android.provider.Settings;

public class GPStrace extends Service implements LocationListener{
private final Context context;
boolean isGPSEnabled=false;
boolean canGetLocation=false;
boolean isNetworkEnabled=false;
Location location;
double latitude;
double longtitude;
private static final long MIN_DISTANCE_CHANGE_FOR_UPDATES=10;
private static final long MIN_TIME_BW_UPDATES=1000*60*1;
protected LocationManager locationManager;
public GPStrace(Context context)
{
    this.context=context;
    getLocation();
}
public Location getLocation()
{
    try{
        locationManager=(LocationManager) context.getSystemService(LOCATION_SERVICE);
        isGPSEnabled=locationManager.isProviderEnabled(LocationManager.GPS_PROVIDER);        isNetworkEnabled=locationManager.isProviderEnabled(LocationManager.NETWORK_PROVIDER);
        if(!isGPSEnabled && !isNetworkEnabled){
         
        }else{
            this.canGetLocation=true;
            if(isNetworkEnabled){              
                locationManager.requestLocationUpdates(
                    LocationManager.NETWORK_PROVIDER,
                    MIN_TIME_BW_UPDATES,
                    MIN_DISTANCE_CHANGE_FOR_UPDATES,this);                  
                }
                if(locationManager!=null){                    location=locationManager.getLastKnownLocation(LocationManager.NETWORK_PROVIDER);
                    if(location !=null){
                        latitude=location.getLatitude();
                        longtitude=location.getLongitude();                      
                    }
                }
            }
            if(isGPSEnabled){
                if(location==null){                    locationManager.requestLocationUpdates(LocationManager.GPS_PROVIDER,MIN_TIME_BW_UPDATES, MIN_DISTANCE_CHANGE_FOR_UPDATES, this);
                    if(locationManager!=null){
                        location=locationManager.getLastKnownLocation(LocationManager.GPS_PROVIDER);
                    if(location!=null){
                        latitude=location.getLatitude();
                        longtitude=location.getLongitude();
                    }
                    }
                }
            }
        } 
    catch(Exception e)
    {
        e.printStackTrace();
    }
    return location;
}
public void stopUsingGPS(){
    if(locationManager!=null){
        locationManager.removeUpdates(GPStrace.this);
    }
}
public double getLatitude(){
    if(location!=null){
        latitude=location.getLatitude();
    }
    return latitude;
}
public double getLongtiude(){
    if(location!=null){
        longtitude=location.getLatitude();
    }
    return longtitude;
}
public boolean canGetLocation(){
    return this.canGetLocation;
}
public void showSettingAlert(){
    AlertDialog.Builder alertDialog=new AlertDialog.Builder(context);
    alertDialog.setTitle("GPS is settings");
    alertDialog.setMessage("GPS is not enabled.Do you want to go to setting menu?");
    alertDialog.setPositiveButton("settings", new DialogInterface.OnClickListener() {
        @Override
        public void onClick(DialogInterface dialog,int which){
            Intent intent=new Intent(Settings.ACTION_LOCATION_SOURCE_SETTINGS);
            context.startActivity(intent);
        }
    });
    alertDialog.setNegativeButton("cancel", new DialogInterface.OnClickListener() {              
        @Override
        public void onClick(DialogInterface dialog, int which) {
            // TODO Auto-generated method stub
            dialog.cancel();
        }
    });
    alertDialog.show();
    }
@Override
public void onLocationChanged(Location location) {
    // TODO Auto-generated method stub
  
}
@Override
public void onProviderDisabled(String provider) {
    // TODO Auto-generated method stub  
}
@Override
public void onProviderEnabled(String provider) {
    // TODO Auto-generated method stub  
}
@Override
public void onStatusChanged(String provider, int status, Bundle extras) {
    // TODO Auto-generated method stub  
}
@Override
public IBinder onBind(Intent intent) {
    // TODO Auto-generated method stub
    return null;
}                     
}
11)Now go to main.xml and right click .select run as option and select run configuration
12) Android output is present in the android emulator as shown in below.

Develop an application that uses Layout Managers and event listeners.

1)Open eclipse or android studio and select new android project
2)Give project name and select next
3) Choose the android version.Choose the lowest android version(Android 2.2) and select next
4) Enter the package name.package name must be two word seprated by comma and click finish
5)Go to package explorer in the left hand side.select our project.
6)Go to res folder and select layout.Double click the main.xml file.Add the code below
<RelativeLayout xmlns:android="http://schemas.android.com/apk/res/android"
        android:id="@+id/relativeLayout1"
        android:layout_width="fill_parent"
        android:layout_height="fill_parent" >

<LinearLayout
            android:id="@+id/linearLayout1"
            android:layout_width="wrap_content"
            android:layout_height="wrap_content"
            android:layout_alignParentLeft="true"
            android:layout_alignParentRight="true"
            android:layout_alignParentTop="true" >

            <TextView
                android:layout_width="wrap_content"
                android:layout_height="wrap_content"
                android:layout_gravity="center"
                android:text="ADDITION"
                android:textSize="20dp" >

            </TextView>
        </LinearLayout>
<LinearLayout
    android:id="@+id/linearLayout2"
    android:layout_width="wrap_content"
    android:layout_height="wrap_content"
    android:layout_alignParentLeft="true"
    android:layout_alignParentRight="true"
    android:layout_below="@+id/linearLayout1" >
    <TextView
        android:layout_width="wrap_content"
        android:layout_height="wrap_content"
        android:text="ENTER NO 1" >
    </TextView>
<EditText
    android:layout_width="wrap_content"
    android:layout_height="wrap_content"
    android:layout_weight="0.20"
      android:id="@+id/edittext1"
    android:inputType="number">
    </EditText>
</LinearLayout>
<LinearLayout
    android:id="@+id/linearLayout3"
    android:layout_width="wrap_content"
    android:layout_height="wrap_content"
    android:layout_alignParentLeft="true"
    android:layout_alignParentRight="true"
    android:layout_below="@+id/linearLayout2" >
    <TextView
        android:layout_width="wrap_content"
        android:layout_height="wrap_content"
        android:text="ENTER NO 2" >
    </TextView>
<EditText
    android:layout_width="wrap_content"
    android:layout_height="wrap_content"
    android:layout_weight="0.20"
      android:id="@+id/edittext2"
    android:inputType="number">
    </EditText>
</LinearLayout>
<LinearLayout
    android:id="@+id/linearLayout4"
    android:layout_width="wrap_content"
    android:layout_height="wrap_content"
    android:layout_alignParentLeft="true"
    android:layout_alignParentRight="true"
    android:layout_below="@+id/linearLayout3" >
 
<Button
        android:layout_width="wrap_content"
        android:id="@+id/button1"
        android:layout_height="wrap_content"
        android:text="Addition"
        android:layout_weight="0.50" />
<Button
        android:layout_width="wrap_content"
        android:id="@+id/button3"
        android:layout_height="wrap_content"
        android:text="subtraction"
        android:layout_weight="0.50" />
<Button
        android:layout_width="wrap_content"
        android:id="@+id/button2"
        android:layout_height="wrap_content"
        android:text="CLEAR"
        android:layout_weight="0.50" />
</LinearLayout>
 <View
                android:layout_height="2px"
                android:layout_width="fill_parent"
                android:layout_below="@+id/linearLayout4"
                android:background="#DDFFDD"/>
    </RelativeLayout>
7) Now select mainactivity.java file and type the following code.
package layout.ne;
import android.app.Activity;
import android.os.Bundle;
import android.view.View;
import android.view.View.OnClickListener;
import android.widget.Button;
import android.widget.EditText;
import android.widget.Toast;
public class LAYOUTActivity extends Activity {
    /** Called when the activity is first created. */
    EditText txtData1,txtData2;
    float num1,num2,result1,result2;
    @Override
    public void onCreate(Bundle savedInstanceState) {
        super.onCreate(savedInstanceState);
        setContentView(R.layout.main);
    
      
       Button add = (Button) findViewById(R.id.button1);
        add.setOnClickListener(new OnClickListener() {
        public void onClick(View v) {
            try
            {
                 txtData1 = (EditText) findViewById(R.id.edittext1);
                    txtData2 = (EditText) findViewById(R.id.edittext2);
                num1 = Float.parseFloat(txtData1.getText().toString());
                num2 = Float.parseFloat(txtData2.getText().toString());
            result1=num1+num2;
            Toast.makeText(getBaseContext(),"ANSWER:"+result1,Toast.LENGTH_SHORT).show();
            }
            catch(Exception e)
            {
                Toast.makeText(getBaseContext(), e.getMessage(),
                        Toast.LENGTH_SHORT).show();
            }
        }
        });
         Button sub = (Button) findViewById(R.id.button3);
         sub.setOnClickListener(new OnClickListener() {

         public void onClick(View v) {
             try
             {
                  txtData1 = (EditText) findViewById(R.id.edittext1);
                 txtData2 = (EditText) findViewById(R.id.edittext2);
             num1 = Float.parseFloat(txtData1.getText().toString());
             num2 = Float.parseFloat(txtData2.getText().toString());
              result2=num1-num2;
             Toast.makeText(getBaseContext(),"ANSWER:"+result2,Toast.LENGTH_SHORT).show();
             }
             catch(Exception e)
             {
                 Toast.makeText(getBaseContext(), e.getMessage(),
                         Toast.LENGTH_SHORT).show();
             }
         }
         });
      
         Button clear = (Button) findViewById(R.id.button2);
         clear.setOnClickListener(new OnClickListener() {

         public void onClick(View v) {
             try
             {
             txtData1.setText("");
             txtData2.setText("");
             }
             catch(Exception e)
             {
                 Toast.makeText(getBaseContext(), e.getMessage(),
                        Toast.LENGTH_SHORT).show();
             }
           
           
         }
         });
      
    }
}
8)Now go to main.xml and right click .select run as option and select run configuration
9) Android output is present in the android emulator as shown in below.

Implement an application that writes data to the SD card.

1)Open eclipse or android studio and select new android project
2)Give project name and select next
3) Choose the android version.Choose the lowest android version(Android 2.2) and select next
4) Enter the package name.package name must be two word seprated by comma and click finish
5)Go to package explorer in the left hand side.select our project.
6)Go to res folder and select layout.Double click the main.xml file.Add the code below
<?xml version="1.0" encoding="utf-8"?>
<LinearLayout xmlns:android="http://schemas.android.com/apk/res/android"
    android:layout_width="fill_parent"
    android:layout_height="fill_parent"
    android:background="#ff0000ff"
    android:orientation="vertical" >

    <EditText
        android:id="@+id/editText1"
        android:layout_width="match_parent"
        android:layout_height="wrap_content" >

        <requestFocus />
    </EditText>

    <Button
        android:id="@+id/button1"
        android:layout_width="match_parent"
        android:layout_height="wrap_content"
        android:text="SAVE DATA" />
    <Button
        android:id="@+id/button2"
        android:layout_width="match_parent"
        android:layout_height="wrap_content"
        android:text="SHOW DATA" />
    <TextView
        android:id="@+id/textView1"
        android:layout_width="wrap_content"
        android:layout_height="wrap_content"
        />
</LinearLayout>
7) Now select mainactivity.java file and type the following code.
package save.sd;

import java.io.File;
import java.io.FileInputStream;
import java.io.FileNotFoundException;
import java.io.FileOutputStream;
import java.io.IOException;
import java.io.InputStreamReader;
import java.io.OutputStreamWriter;
import android.app.Activity;
import android.os.Bundle;
import android.os.Environment;
import android.view.View;
import android.widget.Button;
import android.widget.EditText;
import android.widget.TextView;
import android.widget.Toast;

public class SavedatasdcardActivity extends Activity {
    /** Called when the activity is first created. */
    Button save,load;
    EditText message;
    TextView t1;
    String Message1;
    @Override
    public void onCreate(Bundle savedInstanceState) {
        super.onCreate(savedInstanceState);
        setContentView(R.layout.main);
        save=(Button) findViewById(R.id.button1);
        load=(Button) findViewById(R.id.button2);
        message=(EditText) findViewById(R.id.editText1);
        t1=(TextView) findViewById(R.id.textView1);
        save.setOnClickListener(new View.OnClickListener(){
            public void onClick(View v){
                //Get message from user store in message1 variable
                Message1 =message.getText().toString();
                try{
                    //Create a new folder called MyDirectory in SDCard
                    File sdcard=Environment.getExternalStorageDirectory();
                    File directory=new File(sdcard.getAbsolutePath()+"/MyDirectory");             
                    directory.mkdirs();
                    //Create a new file name textfile.txt inside MyDirectory
                    File file=new File(directory,"textfile.txt");
                    //Create File Outputstream to read the file
                    FileOutputStream fou=new FileOutputStream(file);
                       OutputStreamWriter osw=new OutputStreamWriter(fou);
                    try{
                        //write a user data to file
                        osw.append(Message1);
                        osw.flush();
                        osw.close();
                        Toast.makeText(getBaseContext(),"Data Saved",Toast.LENGTH_LONG).show();
                     
                         }catch(IOException e){
                             e.printStackTrace();
                         }
                }catch (FileNotFoundException e){
                    e.printStackTrace();
                }
            }
        });
        load.setOnClickListener(new View.OnClickListener(){
                 public void onClick(View v){
                   try{
                    File sdcard=Environment.getExternalStorageDirectory();
                    File directory=new File(sdcard.getAbsolutePath()+"/MyDirectory");
                     File file=new File(directory,"textfile.txt");
                     FileInputStream fis=new FileInputStream(file);
                    InputStreamReader isr=new InputStreamReader(fis);
                    char[] data=new char[100];
                    String final_data="";
                    int size;
                    try{
                        while((size=isr.read(data))>0)
                        {
                            //read a data from file
                            String read_data=String.copyValueOf(data,0,size);
                            final_data+=read_data;
                            data=new char[100];
                        }
                        //display the data in output
                        Toast.makeText(getBaseContext(),"Message:"+final_data,Toast.LENGTH_LONG).show();
                         }catch(IOException e){
                             e.printStackTrace();
                         }
                }catch (FileNotFoundException e){
                    e.printStackTrace();
                }
            }
        });
    }
}
8)Next step is to set permission to write data in sd card.So go to AndroidManifest.xml file. Copy and paste the following coding.The code should come before <application> tab.
<uses-permission android:name="android.permission.WRITE_EXTERNAL_STORAGE"></uses-permission>
9)Now go to main.xml and right click .select run as option and select run configuration
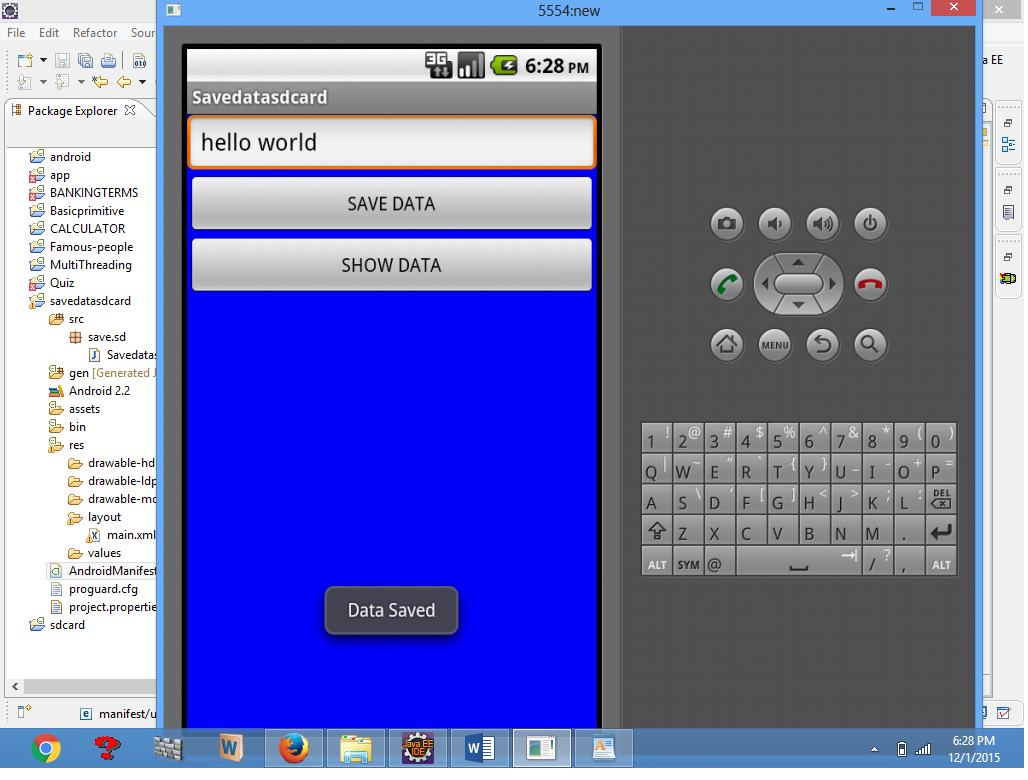
10) Android output is present in the android emulator as shown in below.


Implement an application that implements Multi threading

1)Open eclipse or android studio and select new android project
2)Give project name and select next
3) Choose the android version.Choose the lowest android version(Android 2.2) and select next
4) Enter the package name.package name must be two word seprated by comma and click finish
5)Go to package explorer in the left hand side.select our project.
6)Go to res folder and select layout.Double click the main.xml file.Add the code below

<?xml version="1.0" encoding="utf-8"?>
<LinearLayout xmlns:android="http://schemas.android.com/apk/res/android"
    android:layout_width="match_parent"
    android:layout_height="match_parent"
    android:orientation="vertical"
    android:id="@+id/info" >
      <Button
        android:id="@+id/button1"
        android:layout_width="match_parent"
        android:layout_height="wrap_content"
        android:onClick="fetchData"
        android:text="Start MULTITHREAD" />
    <TextView
        android:id="@+id/textView1"
        android:layout_width="wrap_content"
        android:layout_height="wrap_content"
        android:text="Main thread" />
</LinearLayout>
7) Now select mainactivity.java file and type the following code.
Ypackage multi.threading;


//import your.first.R;
import android.app.Activity;
import android.os.Bundle;
import android.os.Handler;
import android.view.View;
import android.widget.TextView;
public class MultiThreadingActivity extends Activity {
    private  TextView tvOutput;
    private  static final int t1 = 1;
    private  static final int t2 = 2;
    private  static final int t3 = 3;
    @Override
    public void onCreate(Bundle savedInstanceState) {
        super.onCreate(savedInstanceState);
        setContentView(R.layout.main);
        tvOutput = (TextView) findViewById(R.id.textView1);
    }
    public void fetchData(View v) {
        tvOutput.setText("Main thread");
        thread1.start();
        thread2.start();
        thread3.start();
    }
    Thread thread1 = new Thread(new Runnable() {
    @Override
    public void run() {
    for (int i = 0; i < 5; i++) {
    try {
    Thread.sleep(1000);
    } catch (InterruptedException e) {
    e.printStackTrace();
    }
    handler.sendEmptyMessage(t1);
    }
    }
    });
    Thread thread2 = new Thread(new Runnable() {
      @Override
        public void run() {
        for (int i = 0; i < 5; i++) {
        try {
        Thread.sleep(1000);
        } catch (InterruptedException e) {
        e.printStackTrace();
        }
        handler.sendEmptyMessage(t2);
        }
  
        }
        });
    Thread thread3 = new Thread(new Runnable() {
        @Override
        public void run() {
        for (int i = 0; i < 5; i++) {
        try {
        Thread.sleep(1000);
        } catch (InterruptedException e) {
        e.printStackTrace();
        }
        handler.sendEmptyMessage(t3);
        }
             }
        });
       Handler handler = new Handler() {
    public void handleMessage(android.os.Message msg) {
    if(msg.what == t1) {
    tvOutput.append("\nIn thread 1");
    }
    if(msg.what == t2) {
        tvOutput.append("\nIn thread 2");
        }
    if(msg.what == t3) {
        tvOutput.append("\nIn thread 3");
        }
    }
    };
}
8)Now go to main.xml and right click .select run as option and select run configuration
9) Android output is present in the android emulator as shown in below.


Flag Counter